Whether you’re brand new to AdWords or looking to revamp your campaigns, this tutorial will teach you how to use the Google Keyword Planner and will highlight the basic steps to finding great keywords to fit your marketing goals and to take your ads to the top.
What is the Google Keyword Planner?
The Google Keyword Planner is a free keyword research tool provided by Google for AdWords users to find new keywords, keyword trends, average monthly search volume, suggested bids, and much more. It generates results using historical data from real searches entered into data, so you can get a clear picture of what your ideal audience is looking for and how your business can be the answer to their query.
Step 1: Access the Keyword Planner
In order to access the planner, you need to sign in to your Google AdWords account. If you don’t have an AdWords Account, you’ll need to set one up in order to use the Keyword Planner.
If you don’t have an account just yet, head to the Google AdWords homepage. If you’re already logged in to your account, access the Keyword tool by clicking “Tools” then selecting “Keyword Planner” from the drop-down menu.
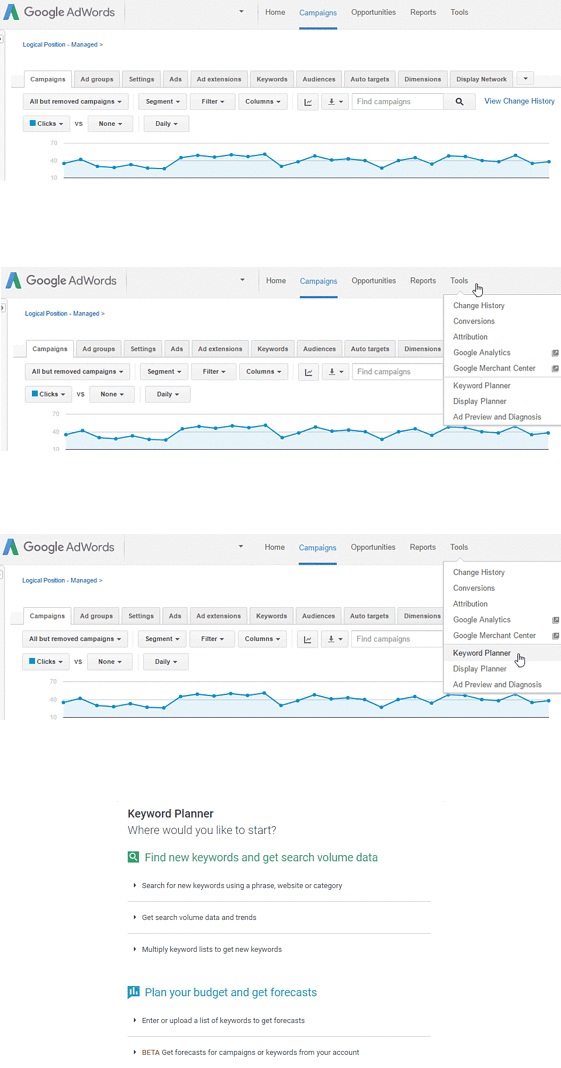
Take a few minutes to jot down a list of potential keywords and phrases that are relevant to your business. Put yourself in the shoes of your ideal customer and brainstorm queries they may use to find your business.
Step 2: Search Data & New Keyword Ideas
Let’s say, you own an auto repair shop in Chicago, IL. Your list of brainstormed keywords might look something like this:
- Auto repair
- Windshield repair
- Auto glass repair
Under “Find new keywords and get search volume data” click the tab labeled, “Search for new keywords using a phrase, website or category.” Start your research by taking a broad look at how often searchers are looking for your products or services. Enter a few keywords from your list into the first box and scroll down to click the blue “Get ideas” button.
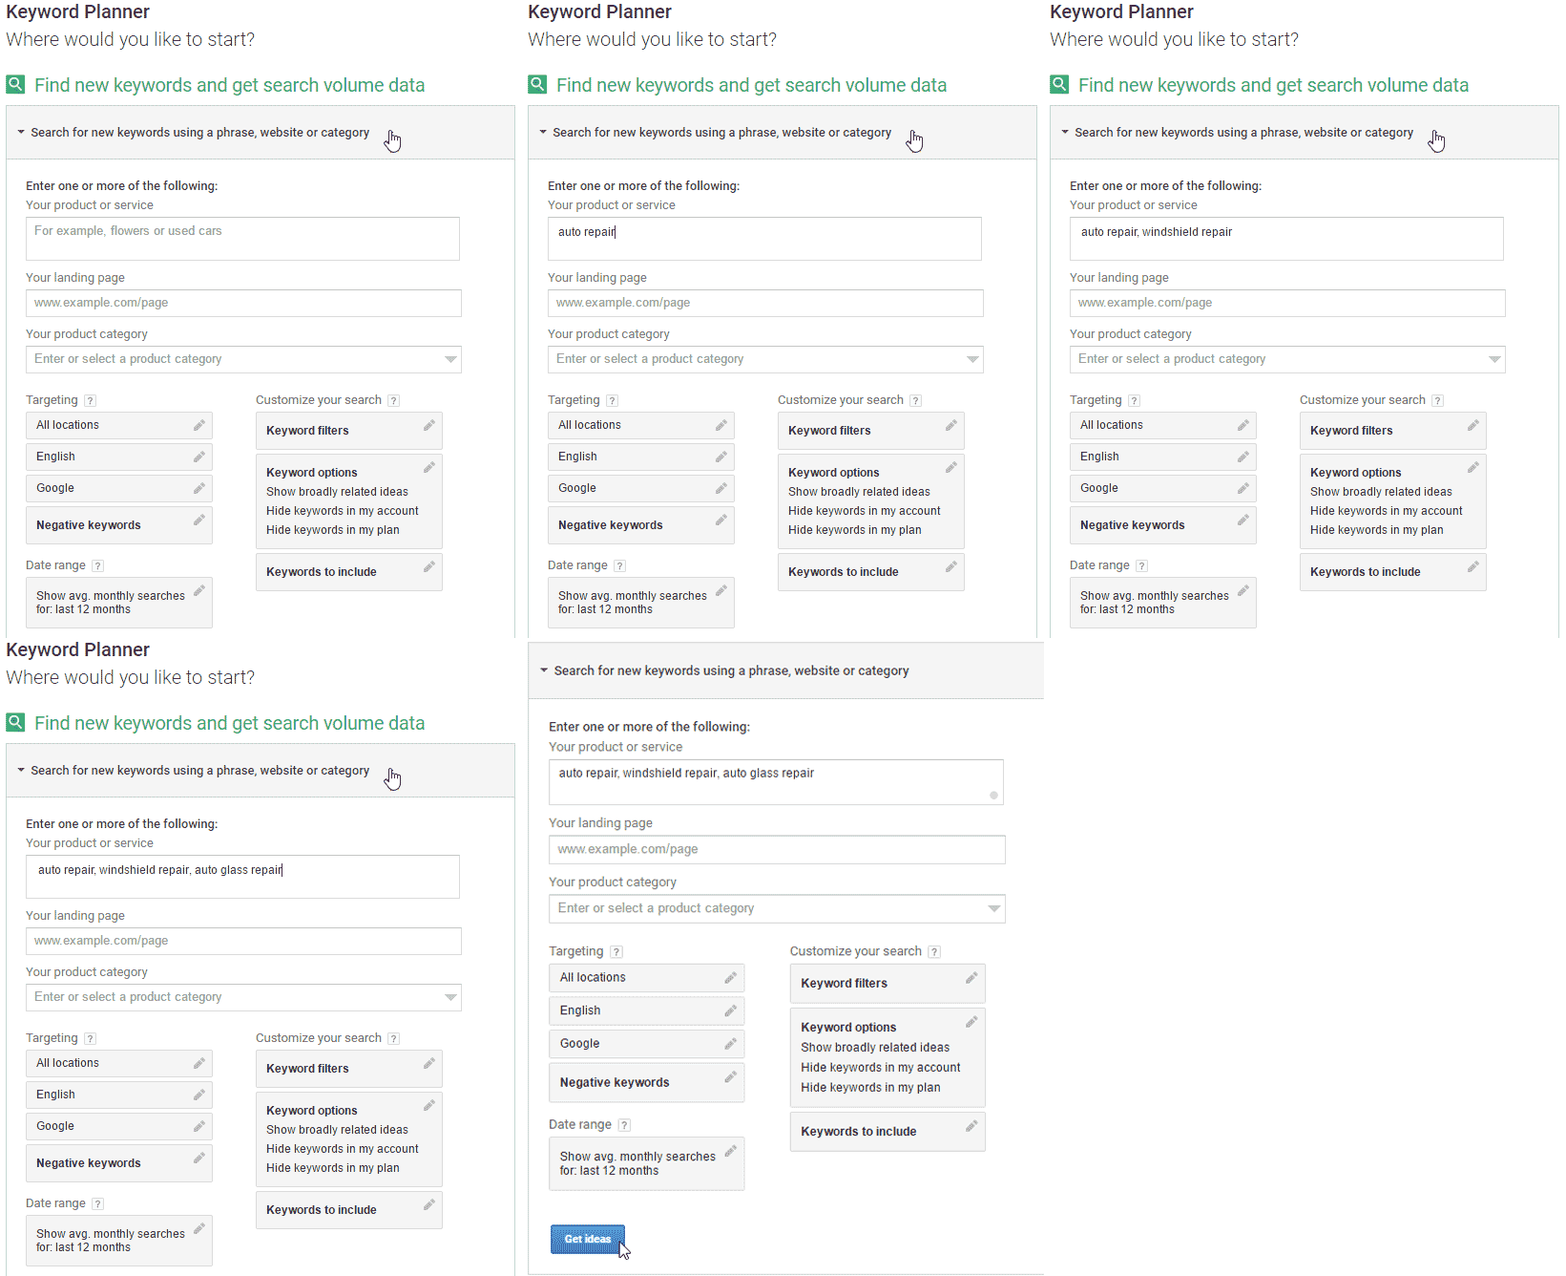
Once the results are generated, here’s what to look for:
- New keyword ideas based on your related products or services
- A substantial number of monthly searches for keywords you want to target
- Competition level among keywords to estimate your potential to rank
- An estimated cost-per-click in the “suggested bid” column to determine a realistic budget
- Opportunities of keywords with high search volume and low competition
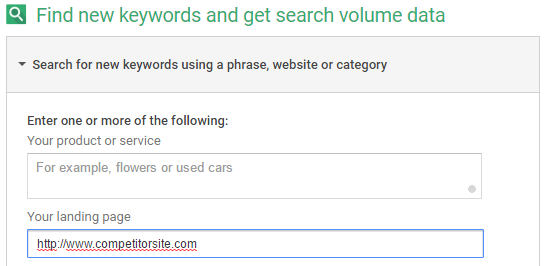
TIP: Keep an eye on your competitors by returning to the Keyword Planner homepage and inserting your competitor’s URL into the box labeled “Your landing page.” The Keyword Planner will generate a list of keyword ideas that can help you stay ahead of your competition.
Step 3: Find the Right Keywords
Now that you have an idea of what to look for, the following step will show you where to look.
Click on the “Keyword Ideas” tab to analyze the data surrounding the keywords you just entered. Just below your search terms is a list chock-full of related keywords and phrases to scan. For each keyword idea, the Keyword Planner generates the number of average monthly searches, the competition level and the suggested bid amount.
By default, the list of keywords is sorted by relevance, but you can easily customize the order of the results by clicking on the column heading of your choice.
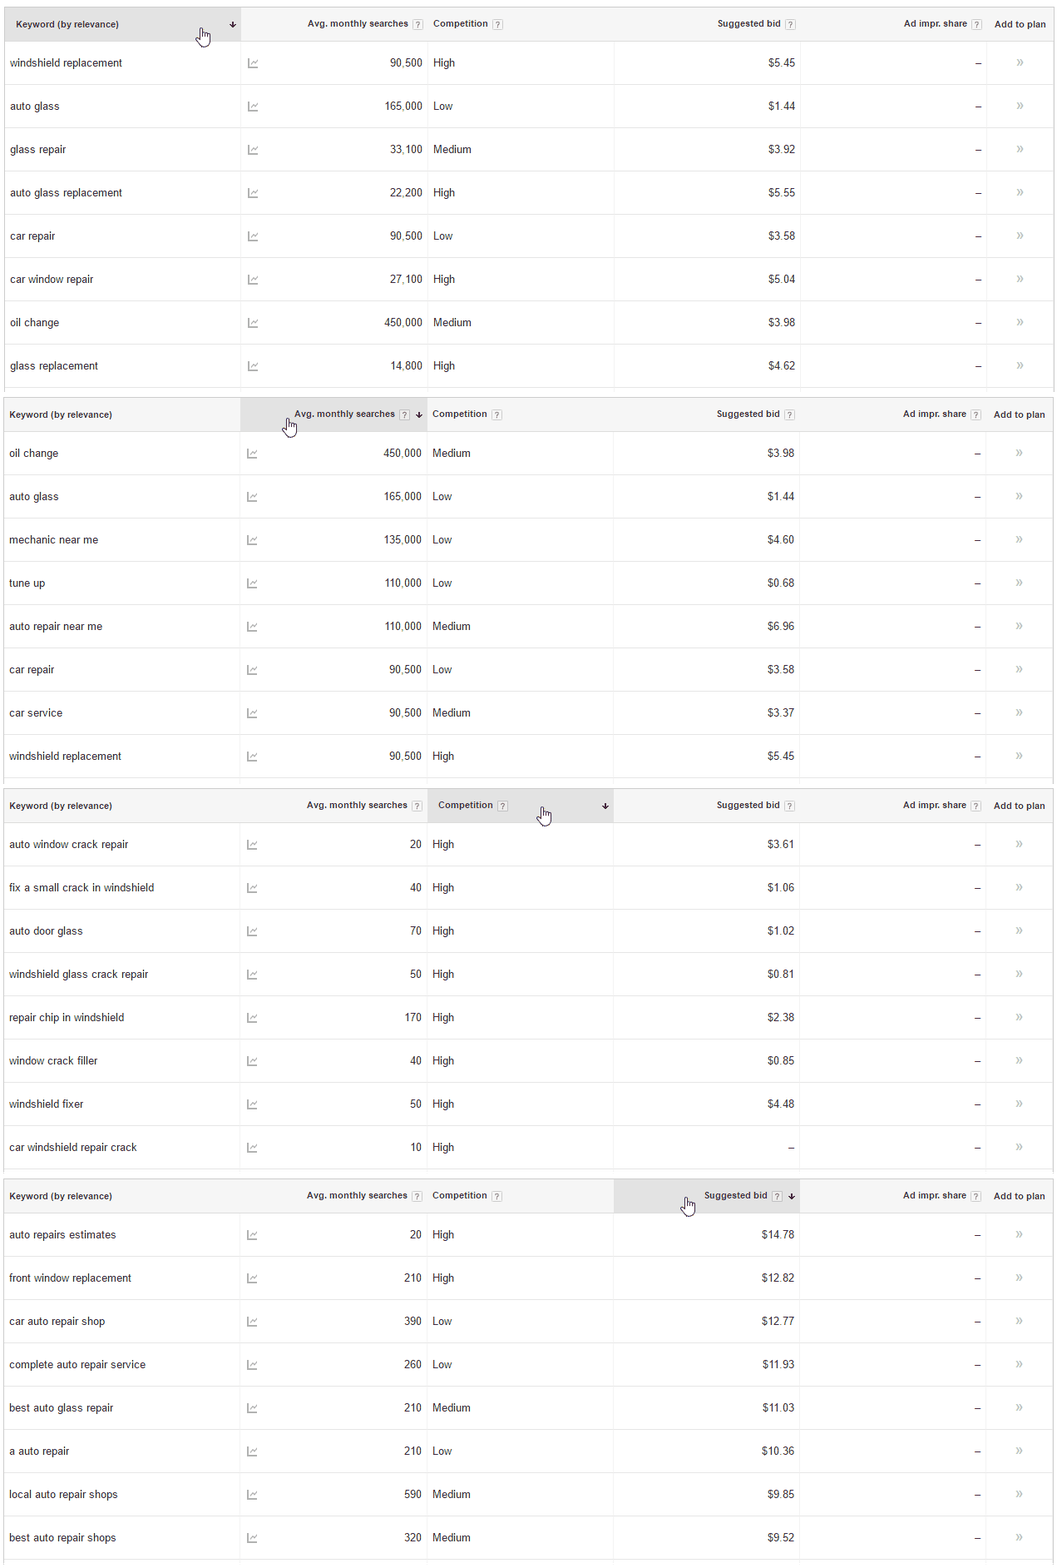
The Keyword Planner pulls from historical data to produce results that you can use to make an educated decision regarding your keywords, rather than make assumptions on a certain keyword’s performance.
For example, general and broad keywords typically have high search volume, so it’s easy to assume, the more people searching, the better it is to target — but that’s not always the case. Research shows that general and broad terms with high search volume only account for about 30% of all keywords that users enter into search engines. The other 70% of keywords are actually very specific key phrases using multiple words called “long-tail keywords.”

Long-tail keywords are proven to be more relevant and convert at a higher rate than broad keywords because the searcher already knows what he or she wants, and is more likely to have intent to buy.
When you’re using the Keyword Planner to research strong keywords to target in your AdWords campaigns, look for longer, more specific keywords that are within your budget.
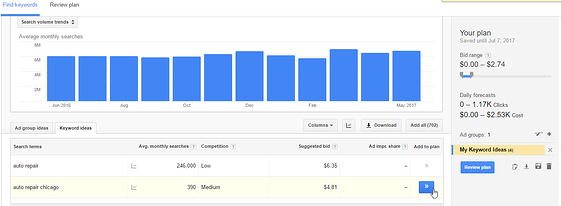
For example, a broad term like “auto repair” has an average of 246,000 monthly searches, and a keyword with a narrow target like “auto repair Chicago” has an average of 390 monthly searches. Although the search volume is significantly lower, targeting the long-tail keyword will save you from paying for potential clicks coming from irrelevant searches from people looking for auto repair services outside of Chicago.

Step 4: Use Targeting and Filters to Narrow Your Results
On the left side of the Keyword Planner, you’ll see a panel with multiple targeting options to customize your keyword research.
At the top of the options panel, click the first tab labeled “All locations.” A window will pop, allowing you to enter in the locations within your business’ target market. Select “Advanced search” for a more interactive and visual way to search for locations or if you already have a long list of areas to target, simply paste them into the “Bulk locations” box.
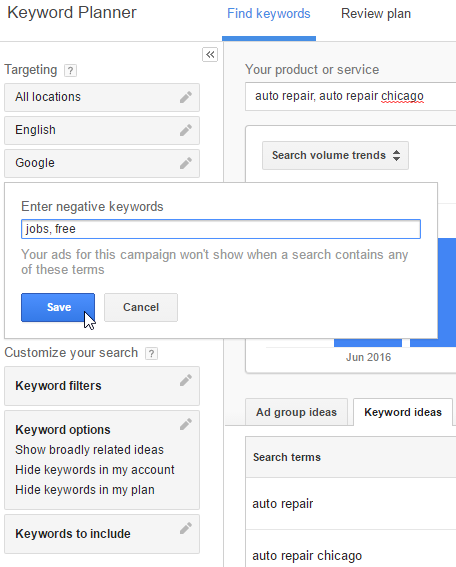
Open the “Negative keywords” target option to enter any keywords that may trigger your ad to show for an irrelevant search term that could result in wasted budget. For example, you’re not looking to hire any new employees and your business doesn’t perform repair work for free, so a couple negative keywords you can include to avoid paying for unwanted clicks are “jobs” and “free.”
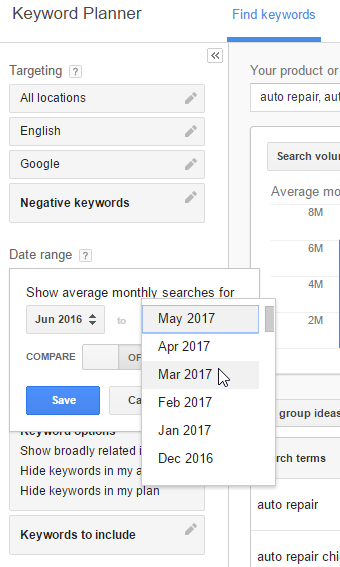
The “Date range” option allows you to choose a specific date range to find search volume for a certain time of year or over multiple years. You can even compare two date ranges to see if search trends have changed over time. This option is a great tool to use to stay ahead of the game when planning and budgeting for your campaigns.
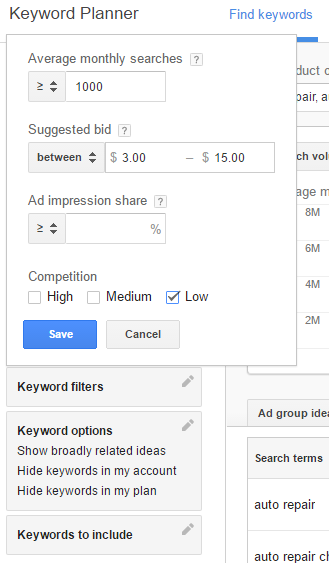
Under the “Customize your search” option, select “Keyword filters” to refine your results by average monthly search, suggested bid, impression share, and competition level. The Keyword filterswill help you easily find keywords that will fit the specific needs of your goals.
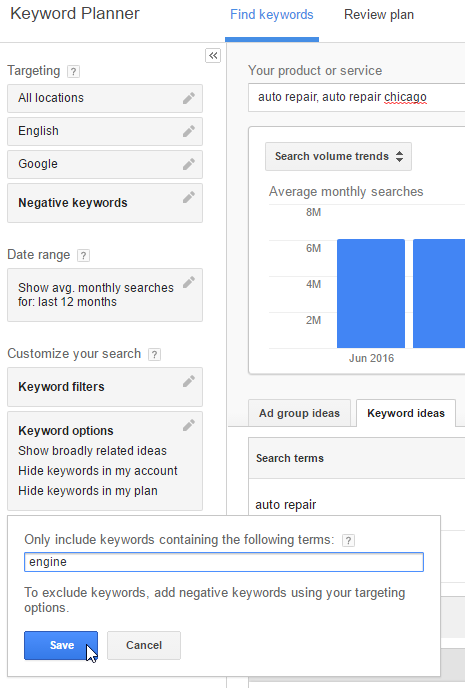
If you’re set on targeting a specific product or service but are looking for new keyword variations, use the “Keywords to include” option. For instance, you want to see searches related to auto repair that include the keyword “engine.” Enter “engine” into the text box, click save, and the Planner will pull up a list of fresh new keywords you may have never thought to target.
Step 5: Add Keywords to Your AdWords Account
Once you find one or more keywords to target, you can save it directly to your account by clicking the double arrows in the “Add to plan” column, located on the right side of the Planner. When you’re finished constructing your own plan using the Google keyword tool, click “Review plan” to evaluate your keywords and make any adjustments to fit the needs of your campaign.
The “Performance forecasts” will give you great data points to play around with budget and bid range that will realistically meet your targeting goals.
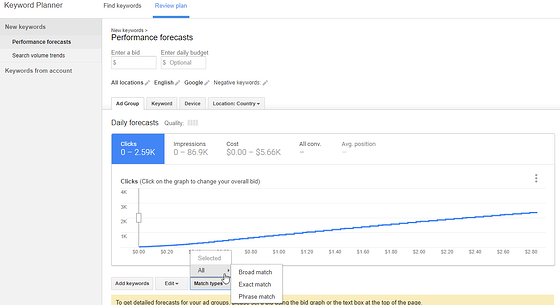
Tip: Use the “Match types” drop down to narrow the focus of your target keywords.
When your plan is to your liking, send your mouse to the top-right corner of your account and select “Save to account,” where you can add your new keywords to new or existing campaigns and ad groups.

Over the next few months, monitor the performance of your keywords to ensure they’re contributing to your account’s performance. Keep pushing your campaigns to the top by making keyword research using Google’s Keyword Planner a recurring practice. Repeat this process to keep your campaigns up-to-date and at the top of the page.
